Client Side Modding pt 2 (auras, dashes, guard)

  • Open scr0.pak with Notepad++. Scroll down to


    Code:
    <DEFAULT_ITEM_PROPERTY> <CHARACTER_TYPE TYPE="HUMAN_ADULT_MALE"> <FACE_MESH> <DATA TYPE ="1" KEY_NAME="A_HUM_FACE_H_M"/> </FACE_MESH> <FACE_BASE_TEXTURE> <DATA TYPE ="1" COLOR_TYPE ="1" TEX_NAME="A_HUM_AD_FSKIN01"/> <DATA TYPE ="2" COLOR_TYPE ="1" TEX_NAME="A_HUM_AD_FSKIN02"/> <DATA TYPE ="3" COLOR_TYPE ="1" TEX_NAME="A_HUM_AD_FSKIN03"/> <DATA TYPE ="4" COLOR_TYPE ="1" TEX_NAME="A_HUM_AD_FSKIN04"/> <DATA TYPE ="5" COLOR_TYPE ="1" TEX_NAME="A_HUM_AD_FSKIN05"/> <DATA TYPE ="6" COLOR_TYPE ="1" TEX_NAME="A_HUM_AD_FSKIN06"/> <DATA TYPE ="7" COLOR_TYPE ="1" TEX_NAME="A_HUM_AD_FSKIN07"/> <DATA TYPE ="8" COLOR_TYPE ="1" TEX_NAME="A_HUM_AD_FSKIN08"/> <DATA TYPE ="9" COLOR_TYPE ="1" TEX_NAME="A_HUM_AD_FSKIN09"/> <DATA TYPE ="10" COLOR_TYPE ="1" TEX_NAME="A_HUM_AD_FSKIN10"/> </FACE_BASE_TEXTURE> <FACE_MULTI_TEXTURE> <DATA TYPE ="1" COLOR_TYPE ="1" TEX_NAME="A_HUM_AD_FACE01"/> <DATA TYPE ="2" COLOR_TYPE ="1" TEX_NAME="A_HUM_AD_FACE02"/> <DATA TYPE ="3" COLOR_TYPE ="1" TEX_NAME="A_HUM_AD_FACE03"/> <DATA TYPE ="4" COLOR_TYPE ="1" TEX_NAME="A_HUM_AD_FACE04"/> <DATA TYPE ="5" COLOR_TYPE ="1" TEX_NAME="A_HUM_AD_FACE05"/> <DATA TYPE ="6" COLOR_TYPE ="1" TEX_NAME="A_HUM_AD_FACE06"/> <DATA TYPE ="7" COLOR_TYPE ="1" TEX_NAME="A_HUM_AD_FACE07"/> <DATA TYPE ="8" COLOR_TYPE ="1" TEX_NAME="A_HUM_AD_FACE08"/> <DATA TYPE ="9" COLOR_TYPE ="1" TEX_NAME="A_HUM_AD_FACE09"/> <DATA TYPE ="10" COLOR_TYPE ="1" TEX_NAME="A_HUM_AD_FACE10"/> </FACE_MULTI_TEXTURE> <FACE_MULTI_TEXTURE_SUPER_SAIYAN> <DATA TYPE ="1" COLOR_TYPE ="1" TEX_NAME="A_HUM_AD_FACE01_S"/> <DATA TYPE ="2" COLOR_TYPE ="1" TEX_NAME="A_HUM_AD_FACE02_S"/> <DATA TYPE ="3" COLOR_TYPE ="1" TEX_NAME="A_HUM_AD_FACE03_S"/> <DATA TYPE ="4" COLOR_TYPE ="1" TEX_NAME="A_HUM_AD_FACE04_S"/> <DATA TYPE ="5" COLOR_TYPE ="1" TEX_NAME="A_HUM_AD_FACE05_S"/> <DATA TYPE ="6" COLOR_TYPE ="1" TEX_NAME="A_HUM_AD_FACE06_S"/> <DATA TYPE ="7" COLOR_TYPE ="1" TEX_NAME="A_HUM_AD_FACE07_S"/> <DATA TYPE ="8" COLOR_TYPE ="1" TEX_NAME="A_HUM_AD_FACE08_S"/> <DATA TYPE ="9" COLOR_TYPE ="1" TEX_NAME="A_HUM_AD_FACE09_S"/> <DATA TYPE ="10" COLOR_TYPE ="1" TEX_NAME="A_HUM_AD_FACE10_S"/> </FACE_MULTI_TEXTURE_SUPER_SAIYAN> <FACE_ANI_MULTI_TEXTURE> <DATA TYPE ="1" COLOR_TYPE ="1" TEX_NAME="A_HUM_AD_FACE01_1"/> <DATA TYPE ="2" COLOR_TYPE ="1" TEX_NAME="A_HUM_AD_FACE02_1"/> <DATA TYPE ="3" COLOR_TYPE ="1" TEX_NAME="A_HUM_AD_FACE03_1"/> <DATA TYPE ="4" COLOR_TYPE ="1" TEX_NAME="A_HUM_AD_FACE04_1"/> <DATA TYPE ="5" COLOR_TYPE ="1" TEX_NAME="A_HUM_AD_FACE05_1"/> <DATA TYPE ="6" COLOR_TYPE ="1" TEX_NAME="A_HUM_AD_FACE06_1"/> <DATA TYPE ="7" COLOR_TYPE ="1" TEX_NAME="A_HUM_AD_FACE07_1"/> <DATA TYPE ="8" COLOR_TYPE ="1" TEX_NAME="A_HUM_AD_FACE08_1"/> <DATA TYPE ="9" COLOR_TYPE ="1" TEX_NAME="A_HUM_AD_FACE09_1"/> <DATA TYPE ="10" COLOR_TYPE ="1" TEX_NAME="A_HUM_AD_FACE10_1"/> </FACE_ANI_MULTI_TEXTURE> <HEAD_MESH> <DATA TYPE = "1" KEY_NAME="A_HUM_HEAD01_H_M"/> <DATA TYPE = "2" KEY_NAME="A_HUM_HEAD02_H_M"/> <DATA TYPE = "3" KEY_NAME="A_HUM_HEAD03_H_M"/> <DATA TYPE = "4" KEY_NAME="A_HUM_HEAD04_H_M"/> <DATA TYPE = "5" KEY_NAME="A_HUM_HEAD05_H_M"/> <DATA TYPE = "6" KEY_NAME="A_HUM_HEAD06_H_M"/> <DATA TYPE = "7" KEY_NAME="A_HUM_HEAD07_H_M"/> <DATA TYPE = "8" KEY_NAME="A_HUM_HEAD08_H_M"/> <DATA TYPE = "9" KEY_NAME="A_HUM_HEAD09_H_M"/> <DATA TYPE = "10" KEY_NAME="A_HUM_HEAD10_H_M"/> </HEAD_MESH> <HEAD_MESH_SUPER_SAIYAN> <DATA TYPE = "1" KEY_NAME="A_HUM_HEAD01_S_H_M"/> <DATA TYPE = "2" KEY_NAME="A_HUM_HEAD02_S_H_M"/> <DATA TYPE = "3" KEY_NAME="A_HUM_HEAD03_S_H_M"/> <DATA TYPE = "4" KEY_NAME="A_HUM_HEAD04_S_H_M"/> <DATA TYPE = "5" KEY_NAME="A_HUM_HEAD05_S_H_M"/> <DATA TYPE = "6" KEY_NAME="A_HUM_HEAD06_S_H_M"/> <DATA TYPE = "7" KEY_NAME="A_HUM_HEAD07_S_H_M"/> <DATA TYPE = "8" KEY_NAME="A_HUM_HEAD08_S_H_M"/> <DATA TYPE = "9" KEY_NAME="A_HUM_HEAD09_S_H_M"/> <DATA TYPE = "10" KEY_NAME="A_HUM_HEAD10_S_H_M"/> </HEAD_MESH_SUPER_SAIYAN> <BODY_MESH> <DATA TYPE = "1" EQUIP = "EQUIP_JACKET" KEY_NAME="A_HUM_J_H_M"/> <DATA TYPE = "1" EQUIP = "EQUIP_PANTS" KEY_NAME="A_HUM_P_H_M"/> <DATA TYPE = "1" EQUIP = "EQUIP_BOOTS" KEY_NAME="A_HUM_B_H_M"/> <DATA TYPE = "1" EQUIP = "EQUIP_TWO_HAND" KEY_NAME="A_HUM_H_H_M"/> </BODY_MESH> <SKIN_COLOR> <DATA TYPE = "1" RED = "255" GREEN = "255" BLUE = "255" /> <DATA TYPE = "2" RED = "255" GREEN = "233" BLUE = "222" /> <DATA TYPE = "3" RED = "231" GREEN = "205" BLUE = "182" /> <DATA TYPE = "4" RED = "201" GREEN = "172" BLUE = "156" /> <DATA TYPE = "5" RED = "159" GREEN = "128" BLUE = "98" /> </SKIN_COLOR> <HEAD_COLOR> <DATA TYPE = "1" RED = "147" GREEN = "91" BLUE = "87" /> <DATA TYPE = "2" RED = "188" GREEN = "29" BLUE = "33" /> <DATA TYPE = "3" RED = "167" GREEN = "164" BLUE = "54" /> <DATA TYPE = "4" RED = "43" GREEN = "43" BLUE = "60" /> <DATA TYPE = "5" RED = "255" GREEN = "255" BLUE = "255" /> <DATA TYPE = "6" RED = "129" GREEN = "146" BLUE = "211" /> <DATA TYPE = "7" RED = "241" GREEN = "120" BLUE = "226" /> <DATA TYPE = "8" RED = "116" GREEN = "252" BLUE = "184" /> <DATA TYPE = "9" RED = "217" GREEN = "68" BLUE = "47" /> <DATA TYPE = "10" RED = "198" GREEN = "82" BLUE = "254" /> </HEAD_COLOR> </CHARACTER_TYPE>As you can see its categorized. We'll be using Human Adult Male as our example, but you can scroll down to your own character type. It works like this:


    Code:
    <CHARACTER_TYPE TYPE="RACE_AGE_GENDER">Keeping file size the same
    In Notepad++ at the bottom of the screen


    e408fa85f61aecf9184f20228028cfc3.png


    That number where it says Length, it can not change. From the moment you open the file to the moment you save it, the number must not change. To keep it the same, scroll down to

  • Code:
    <!-- Human Child --> <upgrade_effect level="11" race="HUMAN" gender="MALE" adult="FALSE" equip_type="JACKET"> <effect_element effect_name="GME_ITM_AM_G03" attach_bone_name="Bip01 Spine2" attach_type="ATTACH_BONE" angle_x="0" angle_y="0" angle_z="90"/> </upgrade_effect>And replace this line


    Code:
    <effect_element effect_name="GME_ITM_AM_G03" attach_bone_name="Bip01 Spine2" attach_type="ATTACH_BONE" angle_x="0" angle_y="0" angle_z="90"/>entirely with spaces! Add and remove spaces as needed to keep the file size the same.
    Determining your character code
    It's actually quite simple. From the character selection screen in-game, make a new character(you don't have to actually make the character, this is just a reference tool). The default options for each race and gender, on all options(Face, Hair, Skin Color and Hair Color) is "1" and each option clicking the Right arrow button is "2", "3", "4", etc. By changing these numbers in scr0.pak, it of course changes the hair, skin, hair color and face you have on your end while in-game.


    Super Saiyan
    This of course only works with humans.


    Under <FACE_MULTI_TEXTURE> go to the DATA TYPE number that corresponds to the face you chose when you made your character, or the face you modded your character to have with the method above. Add _S to the end of it, inside the quotation marks where it says TEX_NAME=""


    Next, under <HEAD_MESH> go to the DATA TYPE number that corresponds to the hair you chose when you made your character, or the face you modded your character to have with the method above. Add _S to the end of HEAD##.


    Now you are a Super Saiyan! (sorta)


    Custom Color
    This is pretty damn cool. Scroll down to <SKIN_COLOR> and <HEAD_COLOR>. As you can see, there are RGB color codes face3.png


    Use this tool to create a color code and use the code to edit the color of the Hair or Skin color your character has. ANY CONCEIVABLE COLOR IS POSSIBLE face3.png


    Unfortunately this does not work on Nameks face6.png


    Hairstyle Mod
    This one is very simple. Go down to <HEAD_MESH> and swap, for example, HEAD01 with HEAD09. Log in and your hairstyle is swapped. The same technique can be applied to the other customization options.


    Aura Mod
    To start, we'll shut off that annoying shimmering effect you get when you upgrade your gear.


    Scroll down to <item_upgrade_property>. On each Vision="1" change it to Vision="0"


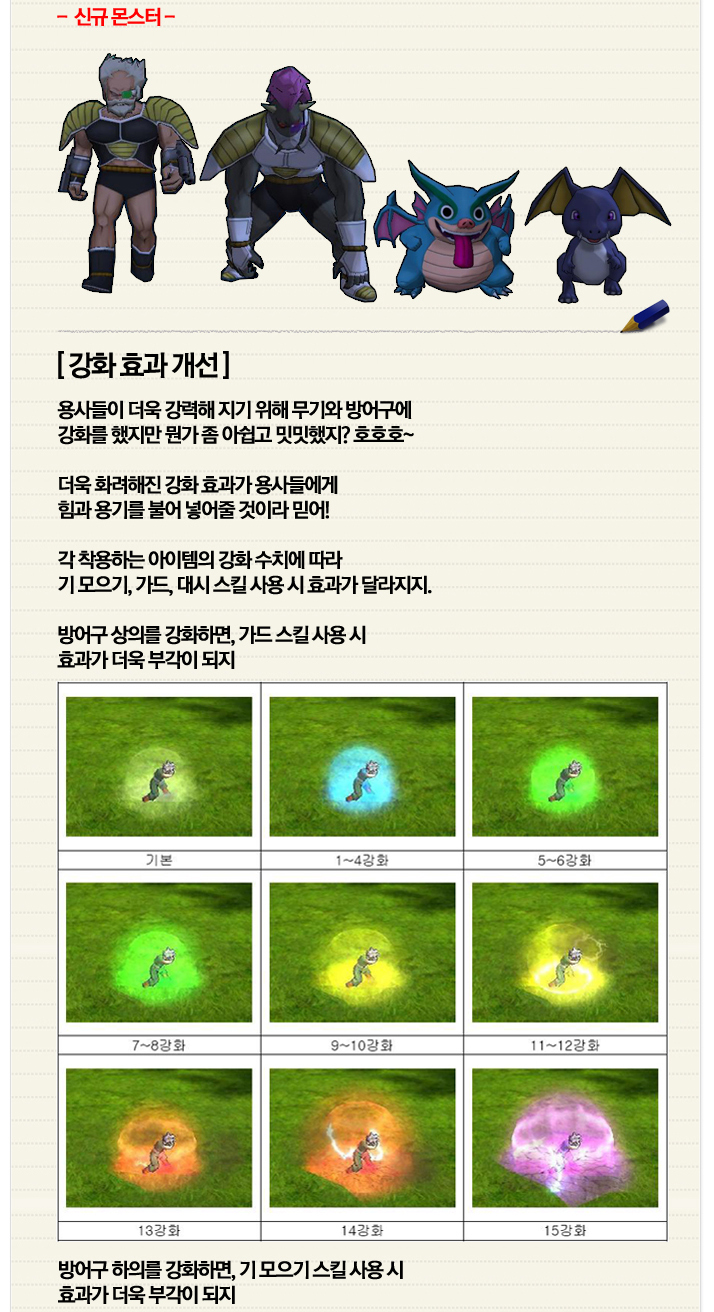
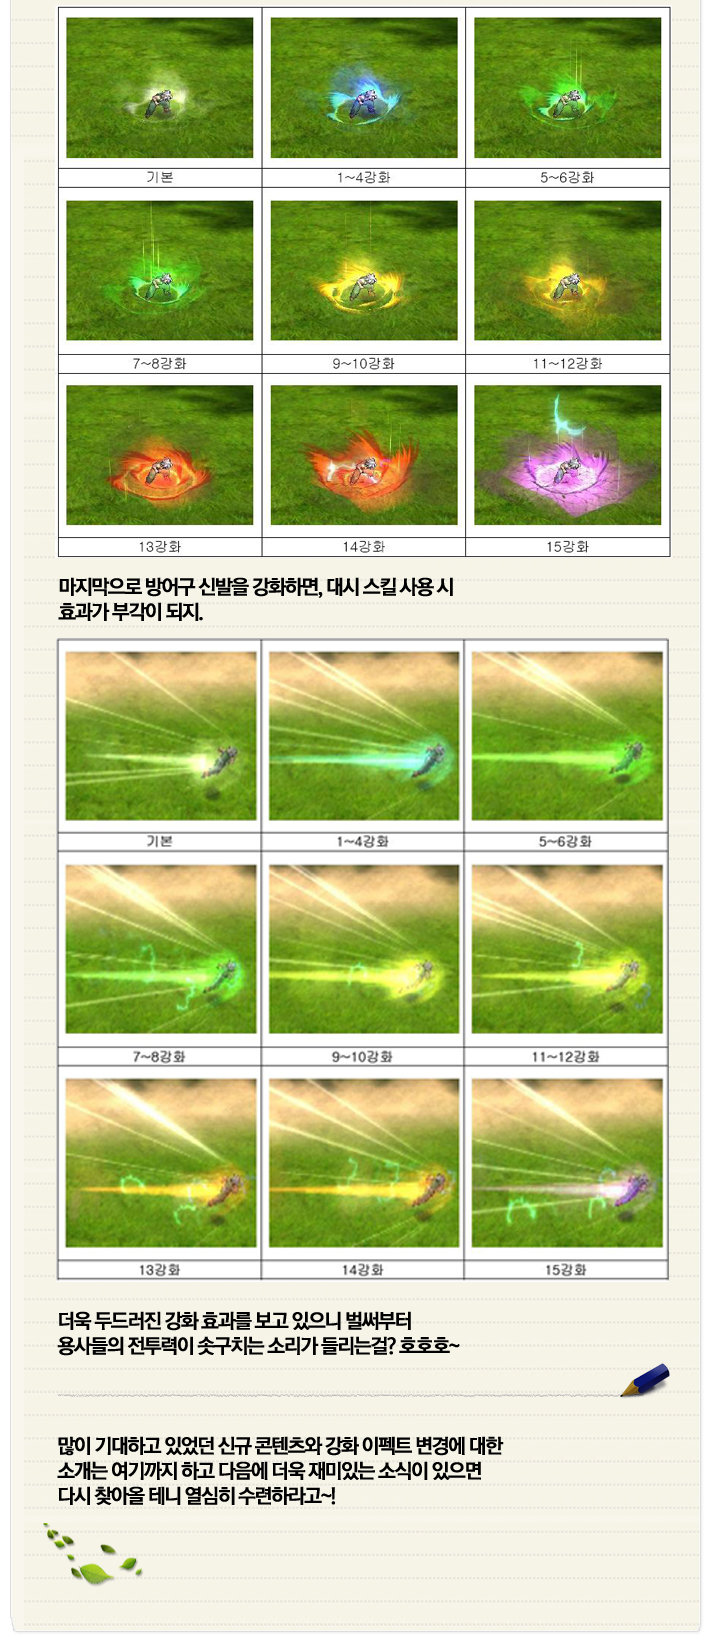
    Now we can get to the real aura modding. Scroll down a bit further and you'll reach the effects for guarding, charging and dashing. Level="#" is what we're here to change. In-game, find out the upgrade level of your Jacket(Guard), your Pants(Charge) and your Boots(Dash). Then simply change that number to the level you want. Use this image to find the aura you want:


    wol_error.gif This image has been resized. Click this bar to view the full image. The original image is sized 714x1312.


    new3.jpg


    wol_error.gif This image has been resized. Click this bar to view the full image. The original image is sized 714x1646.


    new4.jpg


    Last, we will be adding sparks to your armor. Scroll down just a bit further to this part


    Code:
    <!-- race=[HUMAN][NAMEK][MAJIN] gender=[MALE][FEMALE][ONESEX] adult=[TRUE][FALSE] equip_type="[JACKET][PANTS][BOOTS]" --> <!-- attach_type=[BONE][BONE_POS_ROOT_ROTY] -->Go to <!-- Human adult --> for this example. Go down to where it say level="15" and change each one for your gender to the level of your jacket, pants and boots.


    Here you go all credit goes to JakXLT who was the thread creator on dbocom that i got this info from do with it as you will, and do share your results with the community..

  • I've done everything as it's said in guide:
    [I was trying simply remove those shimmering effect from item-enchantment since it look horrible]
    So I've just changed visibility="1" to visibility="0" in all enchant levels


    - lines stay same
    - file size stay same after saving


    and I get this error:
    28aqhqb.png


    Found solution for it:
    That was the problem:

    Open scr0.pak with Notepad++.

    The correct order is next:
    - Open the scr0.pak using Resource Tool and extract necessary file ItemEnchantment or whatever U want to modify with notepad++
    - Open that extracted file with Notepad++ and modify lines U need
    - Save changes
    - Overwrite that file using Resource tool.


    No errors anymore

  • ''Now we can get to the real aura modding. Scroll down a bit further, and you'll reach the effects for guarding, charging and dashing. Level="#" is what we're here to change. In-game, find out the upgrade level of your Jacket(Guard), your Pants(Charge) and your Boots(Dash). Then simply change that number to the level you want''


    i tried that method using notepad++ going in the level part of the code of the aura effects doesn't work when i change the level there when i try to start the game it gives me an error how is the right way to do this? then i tried another route to find the files of the texture of the auras to see if i at least could rename and switch the color of the textures but i just found ik_shout_01_v.dds that is the purple aura for +15 i cant find the other textures for +1 +2 +3 +4 etc... so if anyone know where is the texture of the other charging auras tell me that might be another option to change aura colors instead of messing up with the game code.

  • The last reply was more than 365 days ago, this thread is most likely obsolete. It is recommended to create a new thread instead.

    • :)
    • :(
    • ;)
    • :P
    • ^^
    • xD
    • ;(
    • X(
    • :*
    • :|
    • 8o
    • D:
    • <X
    • ||
    • :/
    • :S
    • X/
    • 8)
    • ?(
    • :huh:
    • :rolleyes:
    • <3
    • 8|
    • :cursing:
    • :thumbdown:
    • :thumbup:
    • :sleeping:
    • :whistling:
    • :evil:
    • :saint:
    • =O
    • :!:
    • :?:
    The maximum number of attachments: 10
    Maximum File Size: 1 MB
    Allowed extensions: bmp, gif, jpeg, jpg, pdf, png, txt, zip

Participate now!

Don’t have an account yet? Register yourself now and be a part of our community!